# Lab 3: In Class
In Lab 2 exercises were done to get acquainted with the Arduino IDE, and confirm that the servos work as expected. Students then did pre-lab research on the servos and ultrasonic sensor to prepare for Lab 3 activities.
The main goals of the Lab 3 exercises are to complete the robot builds and get comfortable with using the serial monitor in the Arduino IDE while confirming that the servos and sensor work as expected.
# Exercises
# Exercise 1: Ultrasonic Sensor
Goal: Understand obstacle detection distance with an ultrasonic sensor
- Using what you learned in the pre-lab do the ultrasonic sensor exercise. Find the distance of the obstacle for each position and output the result to the serial monitor.
# Exercise 2: Servo Calibration
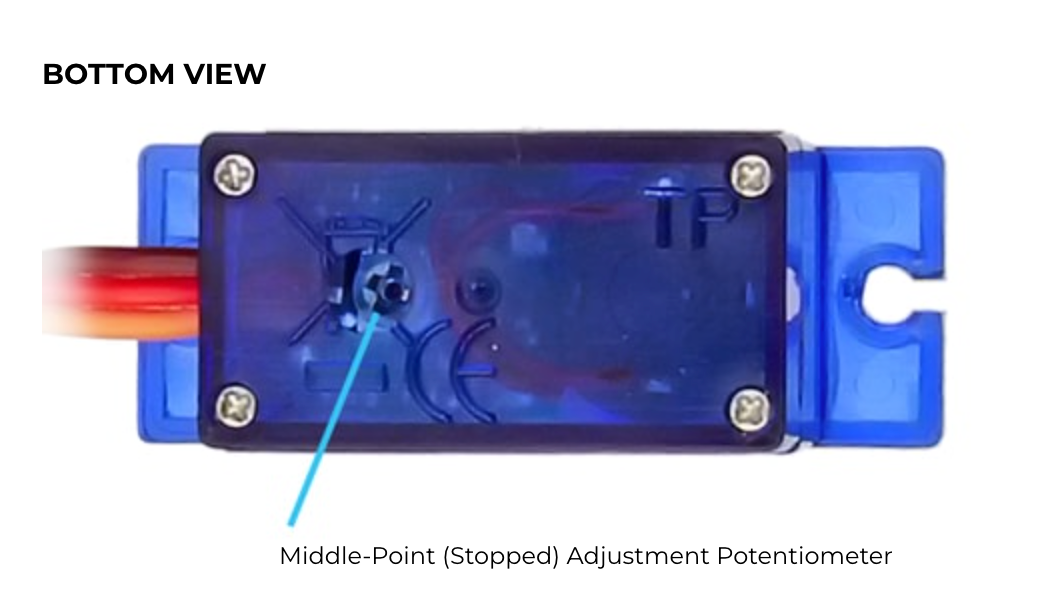
The FS90R servo includes an adjustment potentiometer to calibrate the middle-point (stopped) setting. This setting can be calibrated by sending a 1.5ms pulse signal (position "90" when used with the servo.h library), then slowly turn the middle-point adjustment potentiometer until the servo stops rotating. Access the middle-point adjustment potentiometer by inserting a small screwdriver into the hole in the bottom of the servo. See diagram below.
- Wire up your servos.
- By testing each of your continuous rotation servos independently with an angle of 90, confirm that they do not move. If they are improperly calibrated, they can be adjusted.
Servo wiring
The servos used in this lab are colour-coded as shown in the diagram below:

# Exercise 3: Ultrasonic Sensor Calibration
Goal: finish wiring up the robot and test the ultrasonic sensor using your modified sample code.
- Take an inventory of all your hardware components.
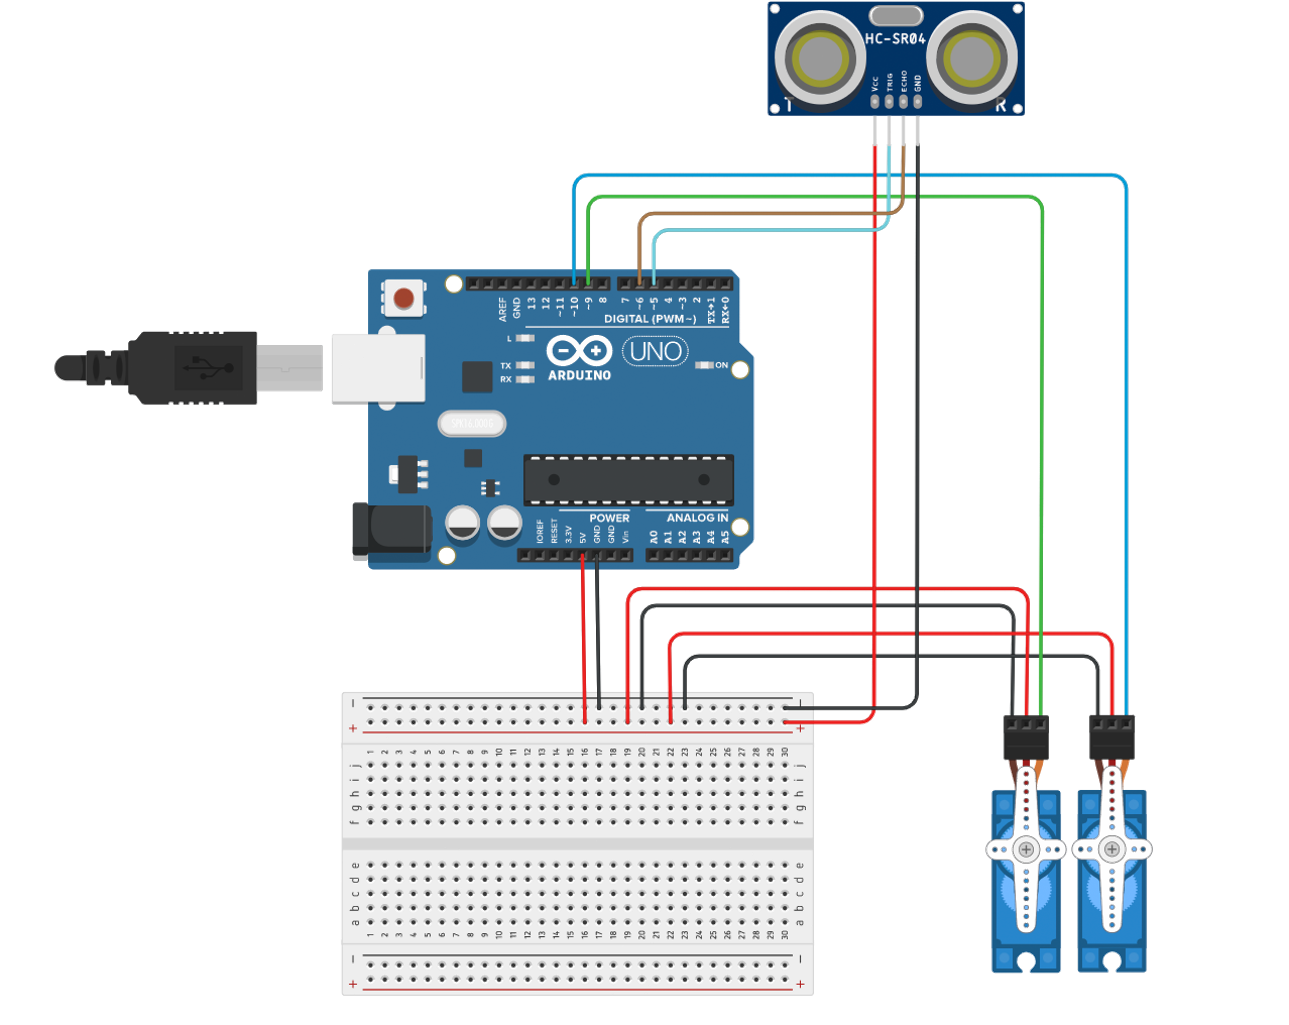
- Connect the servos and the ultrasonic sensor to the Uno board using the schematic provided above. The servos and ultrasonic sensor get 5V power and GND from the Uno board and also connect to digital pins for communication. Note that the 5V pin can be used for output or input voltage. In this case it used for output to the servos and the sensor through the breadboard.
- Upload the working ultrasonic sensor example to your Uno board.
- Open the serial monitor on the Arduino IDE while the program is running by clicking the magnifying glass icon on the far right of the icon ribbon.
Serial Monitor
The Serial Monitor is a separate pop-up window that outputs serial data communicated between the Arduino and your computer. It can be useful for debugging hardware and programming logic.
- Using an object provided in class, place it at known perpendicular distances between 15cm and 75cm in increments of 10cm and measure. Determine the uncertainty in the distance measurement, and confirm that the sensor is working properly. Within 2cm accuracy is reasonable.
Ultrasonic Sensor Range
The HC-SR04 sensor provides 2cm to 400cm of non-contact measurement functionality with a ranging accuracy that can reach up to 3mm. Within the precision of your measurement device can you confirm this accuracy?
- Some other things to experiment with:
Place your object at different angles to the sensor to see how the reading changes;
Change your
delay()to vary how often a measurement is taken.
# Exercise 4: Follow the Wall
Goal: To begin formulating strategies for solving programming tasks.
Refer to the Follow the Wall task for this exercise.
Task
The coins are around 110 cm away from the top wall. Use the data from the ultrasonic sensor to navigate the robot to collect both coins.
# Pseudocode
- Write a rough strategy for completing the task in plain language. Compare your strategy with individuals in the group. Refer to this document for examples. This activity is to be completed for homework, individually.
Some tips for Pseudocode
- For looping and selection, some keywords that can be used include:
- While...End;
- If...Endif with Else, Elseif;
- Call ... as in a function with (parameters);
- Return;
- Words written with careful indentation can allow readable, effective pseudocode. Other examples: set, reset, increment, compute, read, write, calculate, generate, add, sum, multiply, ..., print, display, input, output, edit, test, etc.
# Arduino Sketch
- Start working on a group code solution to collect the coins using a follow the wall strategy. You should be able to perform this task if the lined-up coin configuration had different positions or distance away from the wall. In other words, the robot should be able to follow the wall in a straight line at different distances that can be specified in your sketch. So you should try to avoid using a "hard-coded" strategy for this task. The group solution will be submitted for homework.
← Pre-lab 3 Post-lab 3 →